ShopDreamUp AI ArtDreamUp
Deviation Actions


Description
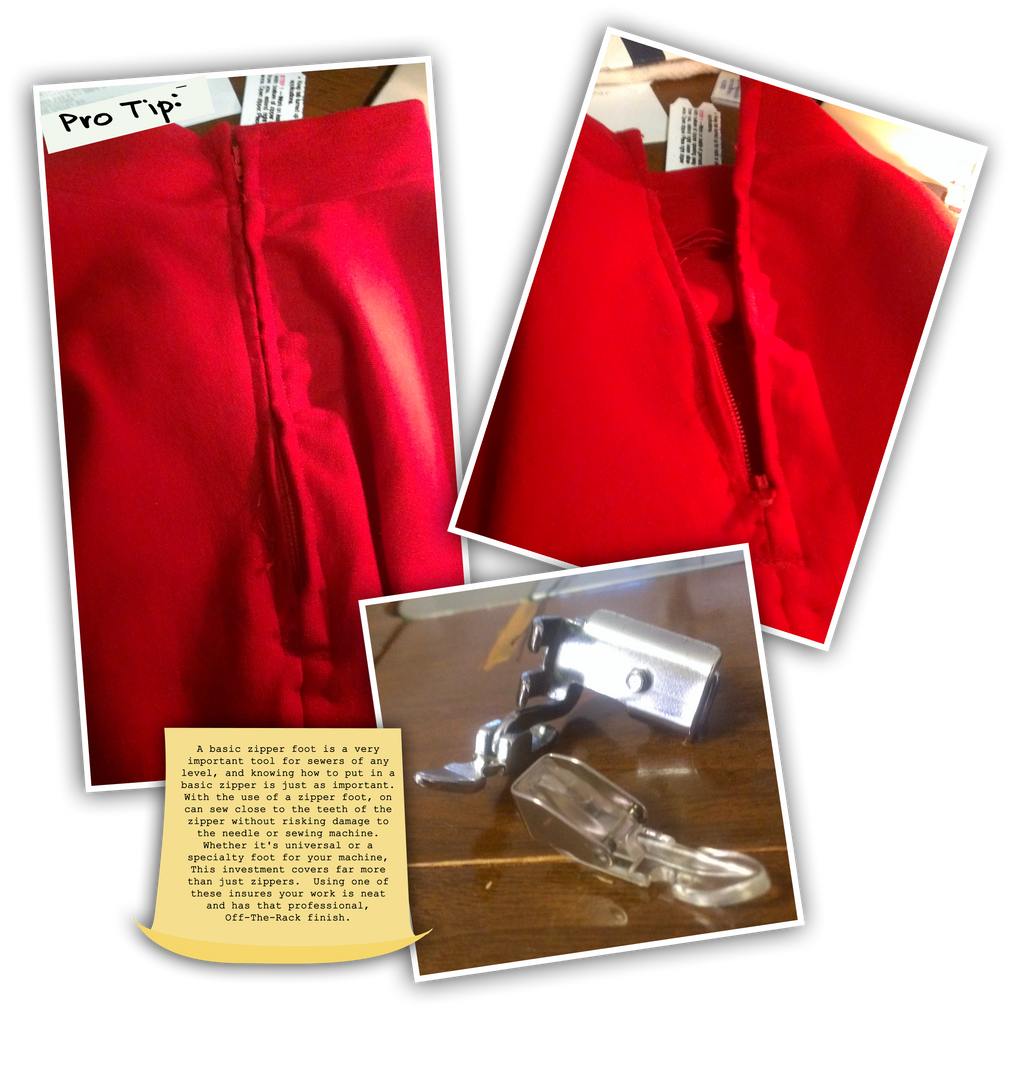
As I've said in the past, many people think zippers can be tricky to install, but with the aid of this previous pro tip,  , it can be made even simple with more of the right tools. For many years, I put off getting myself a zipper foot. At the time, I didn't see a reason to spend the money on a universe one. When I finally did get one, I was kicking myself for not doing it sooner. With most of the zippers you'll be adding into garments, after basting the seam shut, simply pinning or taping the zipper into place, and you're ready to sew!
This particular pro tip features the centered zipper. It's commonly called for in patterns, it's the installation instructions that are included on most standard zipper packaging, and it's on of the simplest zipper styles to add into a sewing project. However, it's imperative that you use a zipper foot, whether it's a universal foot or a specialized foot made for your model of sewing machine, to ensure a neat finish and hassle-free sewing experience. It will keep your needle at least 3/8" away the zipper (through you can always do your top stitching closer if you'd like) as well as keep the actual foot from catching on what you're sewing while you work. It's a strong, sturdy way to install a zipper that will last for a very long time.
If you'd like more information on how to install a centered zipper, here's a great video tutorial: youtu.be/9pk1pbULRjE
, it can be made even simple with more of the right tools. For many years, I put off getting myself a zipper foot. At the time, I didn't see a reason to spend the money on a universe one. When I finally did get one, I was kicking myself for not doing it sooner. With most of the zippers you'll be adding into garments, after basting the seam shut, simply pinning or taping the zipper into place, and you're ready to sew!This particular pro tip features the centered zipper. It's commonly called for in patterns, it's the installation instructions that are included on most standard zipper packaging, and it's on of the simplest zipper styles to add into a sewing project. However, it's imperative that you use a zipper foot, whether it's a universal foot or a specialized foot made for your model of sewing machine, to ensure a neat finish and hassle-free sewing experience. It will keep your needle at least 3/8" away the zipper (through you can always do your top stitching closer if you'd like) as well as keep the actual foot from catching on what you're sewing while you work. It's a strong, sturdy way to install a zipper that will last for a very long time.
If you'd like more information on how to install a centered zipper, here's a great video tutorial: youtu.be/9pk1pbULRjE
Image size
4716x5000px 17.71 MB
© 2013 - 2024 SnowBunnyStudios
Comments0
Join the community to add your comment. Already a deviant? Log In